We are your source for energy efficient products and information.
|
Getting the best results from your insulation kit.
It's no secret that polyurethane spray foam insulation kits are expensive. This guide is put together to better help you get the most out of your investment. Yields on all disposable foam kits (regardless of manufacturer) are calculated assuming that the foam will be sprayed under ideal conditions and with proper technique. There are numerous factors such as temperature, humidity, spray technique, etc. which all affect the consistency and yield of the resulting foam.
As long as you meet the minimum requirements you will spray good foam. However, it is nearly always the case that one or more of the conditions are not ideal when you need to spray your kit. We feel that it is important for you to understand how these different factors can affect the performance and yield of low pressure disposable spray foam kits.
Ideal Temperatures:
There are three different temperatures we are concerned with in regards to spraying. They are listed below in the order of their importance.
Chemical Temperature
(The temperature of the chemical inside the tank is the single most important factor. Spraying when chemical temperature is outside of the proper range will result in a poor quality foam.)
- Open Closed Cell Foam: 80°F ±5°
- High Flow Foam: 75°F ±5°
For more information and for several ideas to help maintain proper chemical temperatures, please read Temperature is Key.
|
|
Tip: A good way to measure the chemical temperature is to shake the tank well and then use an infrared or laser thermometer aimed at the lower 1/3 of the tank.
Substrate Temperature
(Refers to the temperature of the wall or object onto which you are spraying.)
- Ideal substrate temp: 80°F
- Min. substrate temp: 40°F
- Max. substrate temp: 100°F
A cold substrate will pull heat from the foam reducing the amount of expansion.
|
|
Tip: Spraying a thin flash coat is a method commonly used to help warm the substrate.
Ambient Temperature
(This is the air temperature of the area in which you are spraying and is the least critical of the temperatures.)
- The ideal ambient temperature is between 70° and 90°F
Ambient temperatures of 32°F are about the lower limit at which you will even want to try spraying foam. Consider using a space heater to warm the area to at least 50°F.
|
|
Tip: We do have customers that spray foam in freezing conditions. Just be sure to maintain proper chemical temperatures, insulate hoses, and warm the substrate to 50°F or more if possible. Plan on a moderate loss in yield when spraying in extreme conditions.
Spraying Technique:
Spraying technique can have a large affect on foam quality and yield.
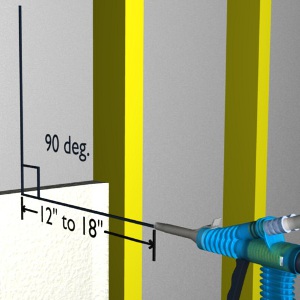
Gun Positioning
(Refers to the angle and distance between gun and substrate.)
- For best results, maintain a distance from the nozzle tip to the substrate of between 12 and 18 inches.
- Move the gun as you spray keeping the spray perpendicular (a 90° angle) to the substrate.
|
|
Tip: Spraying with the gun more than 18" from the substrate may allow some of the expansion gasses to escape the from the chemicals. This results in a higher density foam and an overall lower board foot yield from the kit.
Gun Movement
(Refers to the type of motion, speed of movement)
- Move gun with a slow steady smooth motion.
- Keep gun moving so as not to beat down foam that is expanding.
- Move the gun at a rate of about 1 ft per sec.
- Allow a minimum of 5 minutes between multiple layers.
|
|
|
Tip: Attempting to spray foam too thin (less than 1/2") can result in a higher density foam and a lower overall kit yield. Ultra thin coats won't hold enough heat during curing to allow for full expansion.
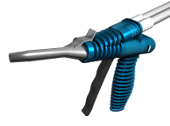
Gun Triggering
(The gun is equipped with a variable flow trigger to help regulate the amount of foam dispensed.)
- In general, it is best to engage the trigger at least 1/2 the way.
- For best results on a new kit, engage trigger between 1/2 and 3/4 the way.
|
|
|
Tip: It is a good idea to stop and change nozzles as needed. After a while of spraying, the foam can start to build up in the mixer affecting proper ratios and on the nozzle's tip restricting the spray pattern.
|
|
|